TUTORIALS
Every now and then I get asked to show how I do something and so this page will give you some insight to how my brain works out the small quilt challenges we come across. Enjoy!
Cutting Multiples of Fusible Shapes
Let me start by saying that I LOVE to hand applique, hand quilt, hand embroider, etc. That being said, I write my applique patterns with fusible instructions since that seems to be the most common method of applique in our industry.
Most people love the look of applique but sometimes get put off by all the pieces especially when there are multiples of one shape. Nothing good comes from NO work, but today I will show you a way to make it a bit less work using the method below.
Most people love the look of applique but sometimes get put off by all the pieces especially when there are multiples of one shape. Nothing good comes from NO work, but today I will show you a way to make it a bit less work using the method below.

Step 1. The first bit of information you will need is the actual size of your template. In the photo above the template is 1-3/8" long x not quite 3/4" wide. For ease of my demo, I am using a precut 2-1/2" strip. When measuring your template and cutting your strips, leave a little extra... The actual strip would be cut @ 1-3/4" wide. 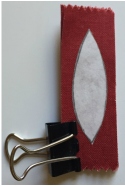
Step 4. Cutting: I can cut up to 4 sections at a time with a wonderful pair of scissors with serrated edges which help to grip the fabric as it cuts. The other way I keep a good grip is with a small binder clip. BINDER CLIPS ARE YOUR FRIEND! You could pin your layers but pinning tends to distort the stack. |
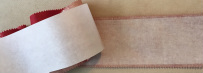
Step 2. You will cut your fabric strips up to a 1/2" wider than needed and your fusible an 1/8" narrower than your fabric strip. Actual fusible cut @ 1-5/8" wide for this template. Cutting the fusible narrower allows that bit of wiggle room so that you aren't fusing glue to your ironing board...Ask me how I know:) 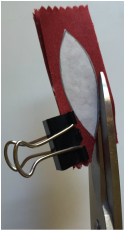
Cut one side of the templates just to the outside of that Freezer paper template. In the photo, you only see the binder clip but remember you will be holding the rest of the stack with your non-cutting hand so slipping should NOT be an issue. Gripping the stack of sections well, carefully reposition the binder clip to the other side and cut. 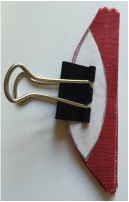
|

Step 3. Cut strip into sections that are the size needed for your template. Remember earlier I said the Actual template is 1-3/8" x not quite 3/4". I will cut my sections at 1-3/4" x 7/8". Make a FREEZER paper template and iron it to the right side of one section. Make sure all sections are fabric side up or you may inadvertently get a reverse piece where you didn't want one. 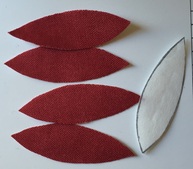
Remove your Freezer paper template and Ta-Da, 4 for the work of one. Repeat this process for as many pieces as pattern calls for. When you are done cutting applique pieces, proceed to the next step of your applique process. |
For more peeks at this process, I invite you to visit the following links to my blog:
http://nestlingsbyrobin.blogspot.com/2015/02/tutorial-cutting-multiples-of-fusible.html
There is an additional tip at the end.
http://nestlingsbyrobin.blogspot.com/2015/11/quiltmaker-100-quilt-blocks-volume-12.html
Shows the above process using my new Heart Bursts block from 100 Quilt Blocks Vol. 12.
-----------------------------------------------------------